Soy candle tunneling mistakes that waste your money
A soy candle that burns straight down the centre of the jar is not simply having an unattractive first burn. It is losing access to its own fuel.
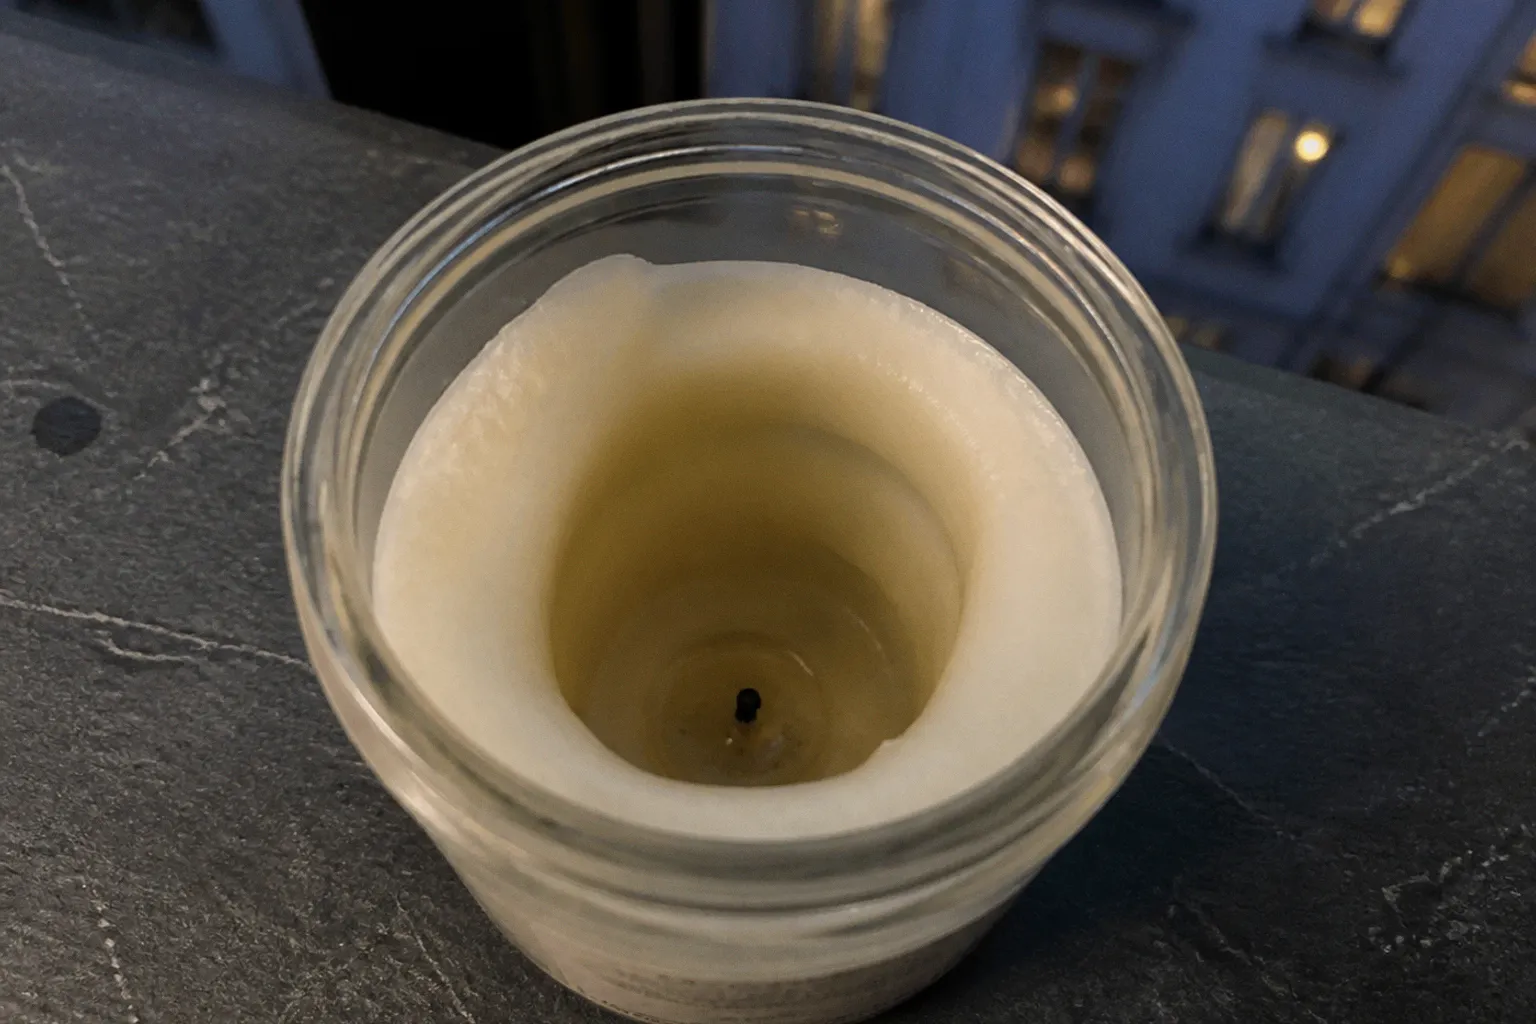
The hard ring of wax left around the vessel can hold a third or more of the candle’s total wax, shortening burn time and weakening the scent throw you paid for.
The most common soy candle tunneling mistakes happen during the first few hours: extinguishing the flame too soon, placing the candle in a draft, or assuming that a luxury candle can be treated like a small tealight. Soy wax is responsive to heat, and that responsiveness gives it a kind of memory. The first melt pool teaches the wax how wide to melt during future burns.
Once a narrow pool has formed, every later lighting tends to follow that same path. The candle may continue burning neatly in the middle while the outer walls become taller and harder. The good news is that a tunnel is often recoverable, provided the remaining wax ring is not excessively deep and you correct the heat pattern rather than simply burning the candle for longer.
The science of wax memory and why tunnels form
Soy wax is a plant-based wax with a soft, creamy structure and a relatively low melting range compared with many harder waxes. In a container candle, the wick must create enough heat to melt a pool that reaches from the centre to the vessel walls. That pool is not only where fragrance is released; it is also the liquid fuel drawn toward the flame.
If the first burn is too short, the candle establishes a small melt pool. The wax near the jar remains solid, and that outer ring becomes part of the candle’s working pattern. This is the soy wax candle memory ring: the visible boundary that tells you how far the wax has learned to melt.
A useful rule of thumb is to allow approximately one hour of burn time for every inch of container diameter during the first lighting. The practical goal is not to follow the clock mechanically, but to let the liquid wax reach the edges of the container. Depending on the vessel and wick, this may take between one and four hours.
The first burn can fail in several ways:
- Extinguishing the candle after twenty or thirty minutes. The flame has warmed only the central column, leaving the perimeter untouched.
- Using a wick that is too small for the vessel. An undersized wick may produce a pleasant, controlled flame but not enough heat to create a full melt pool.
- Burning beside an open window, fan, air-conditioning vent, or frequently used doorway. A draft bends the flame and distributes heat unevenly across the surface.
- Trimming the wick excessively. A wick that is too short may struggle to maintain the heat required by the container.
- Assuming a premium price guarantees perfect performance. Even a carefully made luxury candle can tunnel when the initial burn is interrupted or the vessel is placed in moving air.
Wick sizing is part of the maker’s formulation, alongside wax type, fragrance load, vessel diameter, and the candle’s overall viscosity once melted. But the user’s environment still matters. Two identical candles can behave differently in a quiet room and on a breezy bathroom shelf.
A candle does not remember the label, the price, or the fragrance name. It remembers the shape of its first melt pool.
The fragrance itself can also affect how a candle behaves. Dense fragrance oils, botanical aromatic materials, and different wax blends alter the liquid’s viscosity and the way fragrance moves through the melt pool. That is why a candle with a rich, resinous olfactory profile may not burn in exactly the same way as a light citrus blend, even when both are made with soy wax.
The first burn rule: setting the foundation for even melting
The first lighting is the point at which you have the most influence over the candle’s future. It is not necessary to stare at the flame for hours, but it is worth giving the candle a calm, uninterrupted window.
Place the candle on a level, heat-resistant surface away from textiles and moving air. Keep the lid, matches, bath accessories, and other objects well clear of the flame. In a bathroom, this means avoiding the narrow shelf beside a ventilated window or the edge of a counter where steam and airflow change constantly.
Before lighting, check the wick. A practical trim target is roughly 5–6 mm, or about one-quarter inch. A wick that is too long can produce an oversized flame, soot, and excessive heat. A wick that has been cut almost flush with the wax may have difficulty staying lit. Remove loose carbon from the previous burn, but do not dig into the surrounding wax.
During the first session, watch the melt pool rather than chasing a perfectly timed number. The liquid wax should gradually move toward the jar walls. For a container around two inches in diameter, the rule of thumb suggests about two hours; for a wider vessel, it may take longer. Do not extend the session beyond four hours. The National Candle Association recommends no more than four hours of burning at a time, followed by at least two hours of cooling.
This balance matters. Leaving a candle lit indefinitely is not a reliable way to prevent candle tunneling. Once the wax is fully melted, additional hours can overheat the vessel, enlarge the flame, and create unnecessary stress on the container. A candle needs both a complete melt pool and a proper rest period.
What a healthy first burn looks like
A sound first burn usually develops gradually:
1. The wax begins to liquefy around the wick rather than collapsing instantly into a deep central pool.
2. The melt pool expands outward in a reasonably even ring.
3. The flame remains upright, with only minor movement.
4. The liquid wax reaches close to the jar walls before the candle is extinguished.
5. The vessel is allowed to cool fully before the next session.
The wax does not need to become a boiling, aggressively hot liquid. A broad, calm melt pool is the aim. If the flame is leaning strongly to one side, flickering continuously, or producing visible smoke, move the candle away from the draft once it is safe to do so.
A first burn that ends before the wax reaches the edges does not always doom the candle. Soy wax memory is influential, not irreversible. The earlier you address the narrow pool, the easier it is to restore an even surface.
How to read a tunnel before it becomes severe
Not every uneven wax surface is a true tunnel. Soy wax may cool with a slight depression, a cloudy appearance, or a thin residue on the glass. These are cosmetic irregularities and do not automatically indicate a performance problem.
Tunneling is more specific: the flame continues to consume wax down the centre while a firm, visibly elevated wall remains around the perimeter. The height of that wall matters.
A shallow ring may correct itself during a carefully managed burn, especially if the next session is long enough for the melt pool to approach the sides. A deeper tunnel is more difficult because the flame sits far below the upper edge of the container. The vessel walls shield the heat, and simply repeating short burns only deepens the channel.
Look for these distinctions:
| What you see | What it usually means | Sensible response |
|---|---|---|
| Thin, uneven film on the glass | Cosmetic residue or minor cooling variation | Continue with a properly paced burn |
| Small central pool with a low wax rim | Early tunneling | Give the next burn an uninterrupted session |
| Tall, firm ring around a deep centre | Established tunnel | Use a controlled heat-trap method if the ring is not too deep |
| Tunnel deeper than about one inch | Severe wax loss and limited access to the outer ring | Avoid promising a full rescue; the candle may not recover evenly |
| Flame leaning or flickering near a vent | Draft-related uneven heating | Relocate the candle before the next burn |
A tunnel can also reduce scent performance. The fragrance is carried through the liquid melt pool, and a small pool exposes less scented wax to the heat needed for evaporation. The candle may smell strong when you open the jar but seem faint while burning because too little wax is melting.
This is where candle care becomes part of the sensory experience. A balanced melt pool releases the blend’s primary, secondary, and trace notes more evenly. Bright top notes may emerge quickly, while heavier woods, resins, or vanilla-rich base materials develop more slowly as the pool warms. A narrow, overheated centre can distort that progression.
Rescuing your candle: the aluminium foil heat-trap method
The most accessible method to fix a tunneled candle is an aluminium foil heat trap. Its purpose is simple: retain more warmth around the upper part of the jar so the raised wax ring softens and melts instead of remaining outside the flame’s normal heat pattern.
This method is most appropriate for a shallow or moderate tunnel. It is not a guarantee for a tunnel deeper than one inch, and it should never be used as an excuse to leave the candle unattended.
How to use the foil method
1. Trim the wick to approximately 5–6 mm if it is long or mushroomed.
2. Place the candle on a stable, heat-resistant surface away from drafts.
3. Light the candle and allow the central melt pool to begin forming.
4. Fold a piece of aluminium foil around the upper rim of the jar, creating a loose collar.
5. Leave a clear opening in the centre so the flame receives oxygen and the flame is visible.
6. Check that the foil does not hang into the flame or touch it.
7. Allow the trapped heat to work gradually, checking the candle regularly.
8. Remove the foil once the outer wax has softened and the surface is approaching an even level.
9. Extinguish the candle within the safe burn limit and let it cool for at least two hours.
The levelling process commonly takes about one to two hours. The foil should sit around the rim, not seal the candle completely. A covered flame is a dangerous flame, and an opening that is too small can interfere with airflow.
The goal is not to turn the entire jar into a high-temperature chamber. You are correcting the distribution of heat at the top of the vessel. If the glass becomes excessively hot, the flame grows unusually large, or soot appears, extinguish the candle and allow it to cool.
Do not scrape the hard wax from the sides while the candle is burning. That can push solid pieces into the flame, bury the wick, or change the amount of fuel available too quickly. If wax must be removed from a damaged candle, wait until it is fully cool and handle the vessel carefully.
Foil is useful because it changes the heat pattern, not because it makes an underwicked candle behave like a properly sized one.
After the surface has levelled, the candle still needs a better routine. A rescue burn followed by several short lightings will recreate the same memory ring. Treat the next session as a fresh opportunity: use a calm location, keep the wick at the proper trim, and allow the melt pool to expand without exceeding four hours.
When heat tools help with shallow wax irregularities
For a very shallow tunnel, a hair dryer set to low heat can soften and level the top layer of wax without lighting the candle. This is especially useful when the surface is uneven but the central wick is still easy to access.
Keep the dryer at a safe distance and move the airflow continuously across the surface. Do not aim concentrated heat at one point for an extended period. The intention is to soften the upper layer, not to liquefy the entire jar or heat the glass rapidly.
This approach has clear limits. It does not resolve a tunnel deeper than one inch because the deeper wax remains outside the reach of the surface heat. It can also blow softened wax toward the edge of the vessel or disturb the wick if used aggressively. A heat tool is therefore a finishing tool for shallow irregularities, not a replacement for correct wick performance.
A heat gun requires even more caution. Different soy wax blends respond differently to temperature, and there is no single standardized heat setting that works across every formula. Without knowing the wax blend, fragrance load, vessel specifications, and wick placement, high heat can create more problems than it solves.
If the candle contains dried botanicals, petals, crystals, wooden decorations, or other flammable inclusions, avoid directing heat toward them. Botanical styling can be beautiful, but anything combustible near a flame needs a more conservative approach. The same applies to candles with unusual vessel materials, thin glass, painted surfaces, or labels that extend close to the heat zone.
When not to force a repair
Some candles should not be pushed through an elaborate rescue attempt. Stop using the candle if the vessel is cracked, chipped, leaking, severely discoloured from heat, or showing signs of structural stress. A deep tunnel with a buried wick may also fail to produce a stable, visible flame.
The amount of wax left around the sides is another practical consideration. If the central cavity is deep and narrow, the candle may no longer have enough exposed surface to create a reliable melt pool. Continuing to burn it can overheat the inner area while the outer wax remains untouched.
A candle that cannot be safely corrected can sometimes be repurposed as wax for a wax warmer, but only if the fragrance and materials are suitable for that use and the wax is handled according to the warmer’s instructions. Do not assume that every decorative candle is designed for melting outside its original vessel.
Maintaining burn sessions that preserve scent and wax
Once the candle has been levelled, maintenance becomes pleasantly straightforward. Candle care is a rhythm of modest decisions rather than a complicated ritual.
Before each lighting, inspect the wick and trim it to roughly 5–6 mm. Keep the candle away from drafts and avoid moving it while the wax is liquid. If you carry a burning candle from one room to another, hot wax can spill, and the flame may become unstable.
Burn the candle long enough to create a broad melt pool, but never longer than four hours in one session. Then extinguish it and allow at least two hours for cooling before lighting it again. This gives the wax time to set evenly and reduces the chance of overheating the vessel.
A lid can help keep dust from settling into the wax between sessions, but never place it on a burning candle. If the lid has an inner lining or a strong scent of its own, store it beside the candle rather than pressing it against warm wax.
Here is the routine I recommend when a candle is part of an evening bath or aromatherapy setting:
- Light it after the bathwater, oils, and accessories are already arranged, so you are not reaching across a flame.
- Place it where steam will not condense heavily on the vessel and where a fan or extractor will not bend the flame.
- Keep essential oil diffusers, bath salts, and body oils away from the candle’s immediate heat zone.
- Let the first burn continue until the melt pool has expanded close to the walls, within the four-hour maximum.
- Extinguish the flame with a snuffer or carefully cover it only with a purpose-made lid once the candle is no longer burning.
- Allow the wax to cool before touching or relocating the jar.
Scent and safety should support one another. A strong olfactory profile is not improved by overheating. In fact, excessive heat can make a fragrance feel sharp or unbalanced, flattening delicate top notes while pushing heavier base notes forward too quickly. A controlled melt pool gives the blend space to unfold.
The same principle applies when pairing a soy candle with other bath aromatherapy products. If you are using a carrier oil on the skin, keep the oiled hands away from the candle and wipe away any residue before handling the vessel. Essential oils belong in their appropriate dilution and application format; a candle is not a substitute for topical aromatherapy, and a bath salt blend is not designed to be burned.
Choosing candles that are easier to burn well
User care cannot correct every formulation problem. If a candle repeatedly tunnels despite an appropriate first burn, a calm location, and a properly trimmed wick, the issue may be related to the wick-to-vessel relationship or the wax and fragrance system.
When I assess a candle as a botanical formulator, I look at the whole system rather than treating soy wax as a guarantee of performance. The relevant details include:
- Vessel diameter: A wide jar requires the wick to generate a broader, more consistent heat field.
- Wick design and sizing: Cotton, wood, and other wick constructions behave differently, while an undersized wick can leave a persistent outer wall.
- Wax blend: Pure soy and soy blends have different melt behaviour, surface texture, and viscosity.
- Fragrance composition: Dense aromatic materials may change how quickly the melt pool develops and how the scent travels through the room.
- Container shape: A narrow, tall vessel and a wide, low vessel create different heat patterns even when they hold a similar volume.
- Instructions from the maker: A thoughtful care label should explain the first burn, wick trimming, and maximum session length.
Do not judge a candle solely by whether the first surface looks perfectly smooth after cooling. Soy wax can develop frosting, wet spots, or a softly textured top without being defective. The more meaningful question is whether the candle produces a stable flame and an even melt pool over successive burns.
A premium candle may use a complex fragrance architecture, carefully selected carriers, and a beautifully balanced vessel. That craftsmanship deserves a good burning environment. The price protects neither the wax nor the wick from a short first burn.
A practical route back from a tunnel
If your soy candle is already tunnelling, begin with the least aggressive correction:
1. Check the depth. A shallow ring may resolve during a properly paced burn; a tunnel deeper than about one inch may not fully recover.
2. Inspect the environment. Move the candle away from fans, vents, open windows, and busy passages.
3. Trim the wick. Aim for roughly 5–6 mm before lighting, removing loose carbon without digging into the wax.
4. Use the foil heat trap for a moderate tunnel. Leave a central opening, monitor the candle, and allow approximately one to two hours for the raised wax to soften.
5. Use a low-heat hair dryer only for a shallow, unlit surface irregularity. Keep the airflow moving and avoid high heat.
6. Return to disciplined sessions. Burn for a complete melt pool within the four-hour maximum, then cool for at least two hours.
7. Stop if the vessel or flame behaves abnormally. A cracked jar, unstable flame, excessive soot, or extreme heat is not a repair project.
The most expensive candle mistake is rarely buying the wrong fragrance. It is allowing the first burn to establish a narrow path and then repeating the same short session every evening. Once you understand wax memory, the solution becomes precise: create the right melt-pool width, control the surrounding airflow, and give the wax enough time to reset without overheating the vessel.
A well-kept soy candle should offer more than a pleasant label. It should give you a steady flame, a balanced scent release, and access to as much of its wax as the formulation intended. Protect that first burn, and the candle will usually reward you with a longer, cleaner, more generous aromatic life.